

This white bean cake is moist, fluffy, full of vanilla flavor and has a genuinely good crumb - and it has no flour in it at all. Just blended cannellini beans doing everything flour usually does, with 13.7g of protein and only 1.1g of sugar per slice. You cannot taste the beans. That's not a promise I'm making lightly - it's the thing every single person who makes this says first.
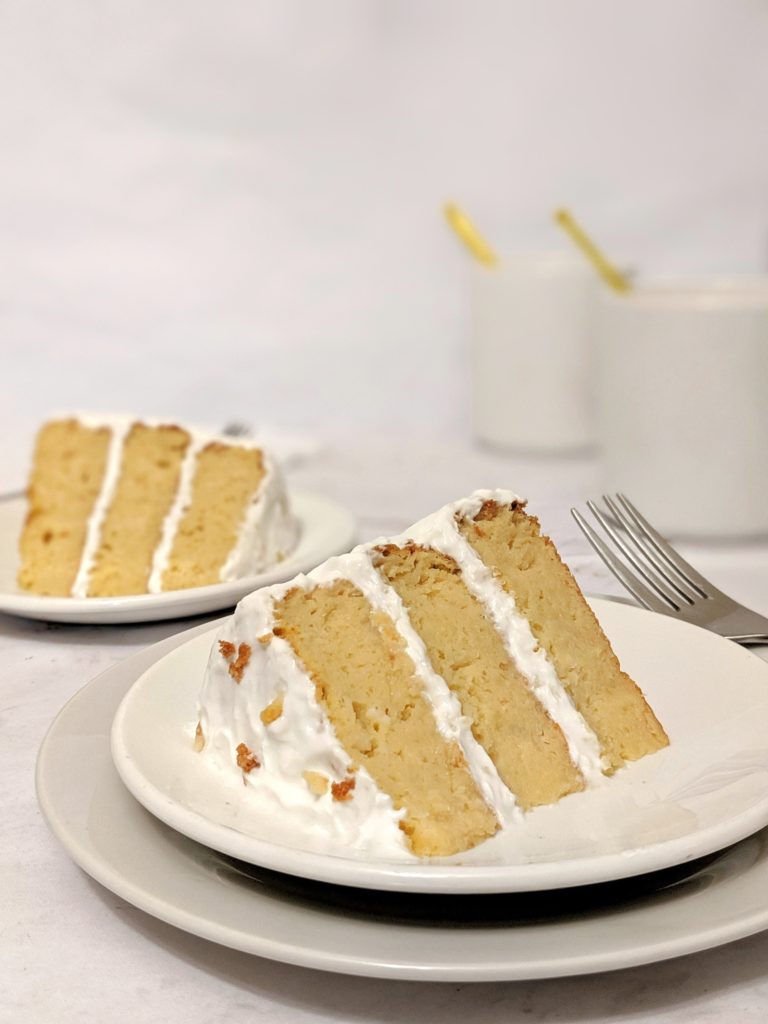
This is one of my oldest recipes on the blog, from 2019, back when I was filming in my apartment with no backdrop and honestly hiding the back of the cake in every photo because it wasn't pretty. The recipe has been quietly getting traffic ever since, and I've gotten so many comments from people with celiac, gluten intolerances, and all kinds of dietary restrictions who've made this their go-to cake. It deserved a proper update.
The inspiration came right after I made my flourless chickpea protein brownies and realized beans in baking were a real thing worth exploring. I went looking for something beyond blondies and brownies, found this cake, and it worked on the first try. Turns out cannellini beans blend into a batter that's remarkably close to a flour-based one - dense and moist without being heavy, and neutral enough that the vanilla completely takes over.
Why You'll Love This Recipe
- 13.7g of protein and 244 calories per slice - from beans, eggs and Greek yogurt, not a supplement.
- No flour, no gluten. The white beans replace it entirely.
- You genuinely cannot taste the beans. Vanilla is all you get.
- 5 minutes of prep. The food processor does most of the work.
- Works for celiac, gluten-free, paleo, and low-sugar diets.
- The Greek yogurt frosting takes about 2 minutes to pull together.
Ingredients for White Bean Cake
Simple list, and most of it you probably already have.
- White Kidney Beans (Cannellini Beans) - the flour replacement and what gives this cannellini bean cake its moist, dense crumb. Use a drained and rinsed can, or cook from dry.
- TIP: Drain and rinse the beans well before blending. Process them alone first until completely smooth - no grainy bits - before adding anything else.
One commenter found it took closer to 10 minutes of processing to get them fully creamy; that's normal depending on your food processor. - Sub: Great Northern beans or navy beans work perfectly. Several readers have made this as a navy bean cake with great results.
- TIP: Drain and rinse the beans well before blending. Process them alone first until completely smooth - no grainy bits - before adding anything else.
- Eggs - structure and lift. Room temperature is important here - cold eggs don't incorporate as smoothly into the bean puree and can affect the final texture.
- Coconut Oil - moisture and richness.
- Sub: Melted butter works in the same amount if you prefer.
- Vanilla Extract - a full tablespoon, and it's the whole point. This is a vanilla cake, so don't go light on it.
- Stevia Sweetener - equivalent to ¼ cup sugar. Use your brand's conversion chart.
- Sub: ¼ cup regular white sugar or monkfruit sweetener. One reader noted monkfruit has less of an aftertaste than stevia if that's been your experience too.
- Baking Powder - the lift. Check the date to make sure it isn't expired; a bean batter is dense and needs baking powder that's actually active.
For the Frosting:
- Greek Yogurt - tangy, creamy, and protein-packed. Spreads beautifully straight from the container.
- Sub: Any thick yogurt or Skyr. Coconut yogurt for dairy-free.
- Vanilla Extract and Stevia - just enough to sweeten the frosting without overpowering it.
How to Make White Bean Cake
One food processor, one bowl, one pan.
- Preheat the oven. 325°F for a glass pan, 350°F for metal.
- Blend the beans. Drain and rinse the cannellini beans, then add to a food processor and process until completely smooth and creamy - about 30 seconds to a few minutes depending on your machine. Don't rush this step. Grainy beans mean a grainy cake.
My protein chickpea blondies use the same flourless bean logic for a chocolate chip version - same idea, totally different result. - Whisk the remaining ingredients. In a large bowl, whisk together the eggs, coconut oil, vanilla extract, baking powder and stevia until combined.
- Combine. Add the pureed beans to the bowl and whisk until fully incorporated and smooth.
- Bake. Pour into a greased 6½" diameter cake pan, smooth the top with a spatula, and bake for 40 minutes or until a toothpick inserted in the center comes out dry.
- Cool in the pan. This is important - let the cake sit in the pan for at least 20 minutes before removing. Bean-based cakes are more fragile warm than flour-based ones.
- Make the frosting. Stir together the Greek yogurt, vanilla and stevia. Spread over the cooled cake. Slice horizontally into layers and add frosting in the middle too if you want.
How to Scale This White Bean Cake Recipe
The original recipe makes one 6½" cake - about 1½" tall and 4 slices.
- Baking time: Always check with a toothpick regardless of pan size. The toothpick should come out dry.
- For a 9" single layer cake: Double the recipe and check for doneness at 30 minutes at 350°F.
- For a 9" three-layer cake: Multiply by 6 (two batches per layer).
Tips for the Best Flourless White Bean Cake
- Blend the beans until completely smooth. This is the step that determines your final texture more than anything else. Keep processing until there's no graininess left, even if it takes longer than you expect.
- Room temperature eggs matter. Cold eggs don't blend into the bean puree as evenly. Set them out 20 to 30 minutes before you start.
- Don't skip the cooling time. 20 minutes in the pan before unmolding is the minimum. The structure needs that time to set.
- Flavor it your way. Several readers have added ground cardamom, anise, or almond extract to the batter - it takes on other flavors beautifully. Stewed strawberries spooned over the top is also incredible.
- Make it your own frosting. The Greek yogurt frosting is light and simple. White chocolate frosting, a chocolate ganache, or even a drizzle of my healthy chocolate ganache all work on top of this cake.
If you want to keep exploring flourless baking, the full cakes and cupcakes collection has a lot of recipes that skip the flour entirely.
FAQ
No. Multiple readers who were skeptical have confirmed this. The vanilla extract completely takes over and the beans just contribute moisture and structure. You'd never guess the secret ingredient.
Cannellini beans (white kidney beans) are what the recipe is built around, but Great Northern beans, navy beans, and butter beans all work. Stick with white beans - their mild flavor is what keeps the cake tasting like vanilla, not legumes.
Yes. Double the recipe for one proper 9" layer and bake at 350°F, checking for doneness at around 30 minutes. For a three-layer 9" cake, multiply by 6.
Yes. Freeze the unfrosted cake only - the Greek yogurt frosting doesn't freeze well. Wrap tightly, freeze up to 2 months, and thaw on the counter.
Melted butter works in the same amount as the coconut oil. A neutral oil like avocado oil also works. Don't use solid fat that hasn't been melted first.
It will bake, but the texture will be grainier than it should be. If your food processor is struggling, try adding a tiny splash of water (a teaspoon at a time) to help it along. Some processors need 5 to 10 minutes to fully smooth out beans.
Storage
- Counter: Covered or in an airtight container, up to 2 days. Store the frosting separately if possible and add it fresh before serving.
- Fridge: Airtight container, up to 5 days. The frosting keeps best cold.
- Freezer: Freeze the unfrosted cake wrapped tightly in plastic, then in a bag, up to 2 months. Thaw on the counter and add the frosting fresh.
If you love a cake that holds up well for meal prep all week, my protein coffee cake with streusel is another one worth keeping in rotation.
More Flourless Recipes You'll Love
- Flourless Black Bean Protein Brownies
- Protein Chickpea Blondies
- Black Bean Chocolate Protein Cake
- No Bake Chickpea Protein Cookies
Flourless White Bean Cake - No Gluten, 13.7g Protein
Ingredients
- 1½ cup White Kidney Beans/Cannellini Beans, Canned (390g) or Cooked from dry (95g)
- 3 tablespoon Coconut Oil, Melted
- 3 Eggs, Room Temperature
- 1 tablespoon Vanilla Extract
- 1½ teaspoon Baking Powder
- Stevia Sweetener, ¼ cup sugar worth (Use your brand's Conversion Chart)
Frosting:
- ¾ cup Greek Yogurt, 150g
- ¼ teaspoon Vanilla Extract
- Stevia Sweetener, 2 teaspoon sugar worth (Use your brand's Conversion Chart)
Are you Making This?
Please leave a ⭐⭐⭐⭐⭐ comment below letting me know what you think! This supports my page so I can continue to give you free recipes. Even 1 sentence is enough 🙂
Instructions
- Preheat oven to 325°F (350°F for metal pan).
- Drain and rise the beans.
- Add beans to a food processor and process until smooth and creamy, about 30 seconds.
- In a large bowl, whisk together rest of the ingredients.
- Transfer pureed beans to bowl and whisk to combine.
- Grease a 6½" diameter glass cake pan and pour batter in, flattening with a spatula.
- Bake for 40 minutes or until a toothpick inserted into the center comes out dry.
- Remove from oven and let sit 20 minutes to cool before removing from the pan.
- Combine yogurt and sweetener, and spread on cake as frosting. Slice into layers horizontally if you wish and smear some in between too!
Notes
- Servings: 6½" wide x 1½" high cake | Serving size: ¼ cake
- Calories: 244 cal
- Fat: 13.8g | Saturated fat: 10g
- Carbohydrates: 16g | Fiber: 4.5g | Sugar: 1.1g
- Protein: 13.7g
Laura says
Hi! i wonder if this recepie woid be good if you added like 2 sliced apples to it and add 3/4 tbsp. of powdered peanut butter to absorbe the extra moisture from the apples. Lots of love!
Haylee Jane Monteiro says
Hi Laura,
Omigosh I absolutely love your idea of making an apple peanut butter variation!
Two sliced apples will release a significant amount of liquid as they bake, and you might end up with a gooey wet center.
I would say do one apple, and make sure its very finely chopped or thinly sliced. For the PB Powder along with the apples, try 1/4 cup (= 4 Tbsp).
Could you let me know how this turns out? I'd love to update the recipe
Lau says
I made it just now and it came out great! I slices the apples very thinly with a mandolin and added cinnamon and brown sugar. I think you could get away with adding more apples tho but I'm not sure cuz the texture is very light❤️
Amy says
Hello, if I want to make a 9" 3 layered cake, does that mean I multiply the recipe by 3?
Haylee Jane Monteiro says
Hi Amy! I used a 6.5" cake pan for this recipe. If you want to make it in a 9" cake pan, you would need to multiply the recipe by 2. Also be sure to check if cooked using toothpick or tester inserted into the middle before removing it out of the oven.
This would give you one proper thick layer.
If you want 3 thick 9" layers, it would be multiply by 6!
Let me know how that turns out!!
Kathy says
Can you substitute using Great Northern Beans?
Haylee Jane Monteiro says
Hi Kathy! So excited that you want to try out this cake! Yes - you can certainly use Great Northern Beans 🙂 Can't wait to know what you think!
Kat says
Do you drain and rinse the beans first? Thank you.
Haylee Jane Monteiro says
Hi Kat! Im so excited that you want to try out this recipe! Yes, you'd need to drain the can out so you only use the beans.
Thanks for catching that! I'll go update the post to add a note 🙂
Sarah says
Do I have to use a glass cake pan?
Haylee Jane Monteiro says
Hi Sarah, you don't have to use a glass pan. Any cake pan would do.
Carla says
Hello,
Ive made kidney bean cake before, and it is so rich and delicious, great for my gluten free friends.
I'm planning on making your cake this week, with a couple of minor changes and omissions. I was wondering if you have ever made it and then frozen it to eat on a later day?
Im going to make a white chocolate icing for it, as I'm unsure how it would go with white chocolate in the cake itself.
Haylee Jane Monteiro says
Hi Carla, looking forward to what you think of the cake! I have not frozen it but it should probably work.
LeAnn says
Hi! I have a stevia allergy, what would the measurements be for white sugar? And can I use butter instead of coconut oil? Thanks!!!
Haylee Jane Monteiro says
Hi LeAnn!
So sorry to hear that! You can replace the stevia with ¼ cup sugar, and yes - melted butter works perfectly well instead of coconut oil!
I'd actually love to know what you think of the cake when you try it out!
Elena says
this is wonderful. I just added some more flavors, like ground cardamon, or anise, just to kind of spice it up a little. Also, I find that monkfruit sweetener has less of an aftertaste than stevia. Thanks!
Haylee Jane Monteiro says
Those flavors sound amazing! Glad to know about the monkfruit as well 🙂
Hoda says
Awesome!!! And i quickly stewed some sliced fresh strawberries and added a few drops of almond extract with sweetener and spooned it on top of the sliced cake I served. Thank you very much for this recipe. I am very sensitive with my celiac so since 2019 when I found out, I did without cake but now this opens up a new baking adventure and is healthier too.
Haylee Jane Monteiro says
This really made me smile Hoda! I'm so happy I was able to help you enjoy treats with the restrictions 🙂 Such a great idea with the strawberries too!
Beth says
Make this cake!!!!! The beans are a magic ingredient!!! I used navy beans that I made in the instapot.
I also doubled this recipe and it made a slightly shorter 2 layer cake in 9 in pans, cooked for 30 min at 350 and came out amazing. I will definitely make again.
Haylee Jane Monteiro says
Oh my gosh Beth! You make me feel like this was a hidden gem. It's been a while since I've made this white bean cake.
I'm so glad you loved it! I love the two layer idea as well. Definitely going to keep it on my mind for next time
Beth says
I came back two years later to make this cake and was so happy to see where I left the comment about doubling the recipe and the pan size I needed!!! Its a favorite for sure!
Haylee Jane Monteiro says
I am so touched you came back for this recipe Beth! I was considering revamping it, but now you make me want to leave it as is!
Wilma Galea says
was wondering can you freeze this cake.
Haylee Jane Monteiro says
Hi Wilma, SO looking forward to what you think of this cake! I haven't tried freezing it but it should probably work. Just be sure to thaw it for a few hours before having!
Maria Gassner says
Have you tried making this as cupcakes?
Thanks!
Haylee Jane Monteiro says
Hi Maria, I have not, but that is an amazing idea! I'd love to know what you think if you try it out.
Definitely reduce the baking time though. I would say start checking at about 20 minutes!
Elena says
I am making these right now as cupcakes and wil let you all know how they come out. I also made an icing for a cake a few days ago with soaked cashews, coconut cream, and coconut sugar (and some good cocoa!).
Caroline says
Hello, Do I drain and rinse the beans before I puree them?
Thank you
Haylee Jane Monteiro says
Hi Caroline!
Yes, that's right. You want to drain out the liquid and rise the beans before using them here.
I can't wait to know what you think if you try it out!
Dani says
A keeper, will be doing it again. Turned out great and you can't taste the beans, I'll double the batter next time as it didn't rise and wound up too small. However, I had to process the beans for about 10 minutes until I got them to a flour-like consistency, I couldn't make it become creamy.
Haylee Jane Monteiro says
I'm really glad you liked how it turned out Dani! The beans definitely don't come through in this cake.
Regarding processing the beans, did you use dry ones (I'm assuming so since you said flour-like consistency)? The recipe is actually designed for cooked beans; May be that was why it didn't rise as much!
I'd love to know how it turns out if you try it with cooked beans.
Sam says
My adult family is on a weird kick for no-cholesterol, no-sugar, no-flour diet and that really whittles down any dessert recipes. (I don’t mind a little sugar in a healthy dessert, but I can’t eat a whole pan of black bean brownies by myself!) There are many “low to no sugar” recipes out there but they all have an equivalent substitute like syrup or honey that contains the concentrated carbohydrates. Switching out the moist sweeteners for stevia makes for a drier product.
Finally, I find this recipe for a moist and cake-flavored desert that only uses stevia. I baked it on the spur of the moment so the eggs weren’t room temperature (my bad), but the flavor and texture was great! I put in a 1/2 tsp of stevia and I will add more next time. The cake was dense like cornbread but not gritty. (Might’ve been on account of the eggs; I had small ones so I did add an extra to be sure.) The family gobbled it down and made me promise to bake more. I offered to add cocoa powder and they asked to keep it as-is. This will be a great base for other flavors and toppings. Definitely a keeper!
Haylee Jane Monteiro says
Oh my gosh Sam, You just made my day!
Firstly, thank you for trying out my recipe, but an even BIGGER thank you for taking the time to leave such a detailed comment! I really do appreciate you taking the time to share your thoughts.
I'm really so happy you tried this out. Stevia-sweetened cakes really can work out 🙂 I hope you find some more on here to try!